As with ordinary householders, illumination plays an important role in the daily life of RVers. While traveling on the road, RVers depend on the lighting fixtures of their recreational vehicle to carry out various activities that require well-lit surroundings. But nothing last forever so every now and then, RVers must replace burnt-out bulbs in such fixtures which involve the removal of the covers. That particular task might prove difficult unless you know how to remove RV light covers. One mistake and you could end up with broken components.
Contents
Detaching The Covers Of Lighting Fixtures
So some lighting fixtures on your RV have been acting up lately but you are unable to address the situation as the covers seem unmovable? If that is the case, this article would provide you with a couple of basic tips and tricks on how to remove RV light covers. Overall, you should be able to dislodge the majority of light covers to expose the bulbs underneath with relative ease. The key is to deduce the removal mechanism which tends to differ from fixture to fixture so it’s of utmost importance to be patient.
Tool And Gears To Have
Generally speaking, you could do away with most RV light covers using your bare hands. That being said, some components might degrade (rush, deform..) overtime which complicates the removal process. That is why it’s a good idea to keep on hand tools such as scrapers, screwdrivers and so on to tackle stubborn light covers. About the gears, as you have to work around sharp tools in addition to electricity, a solid pair of electrical gloves shall come in handy. After you finish with the preparation then it’s time to get down to business.
Manipulating The RV Light Covers
Quick Reminder: Before you start, it’s strongly recommended that you drop by the website of the manufacturer in order to see if it possesses information about the lighting fixtures. With some luck, you would be able to locate a section that teaches you how to remove RV light covers. Moreover, visit the owner forum as well since experienced RVers often know the best way to work loose the covers of RV-specific lighting fixtures.
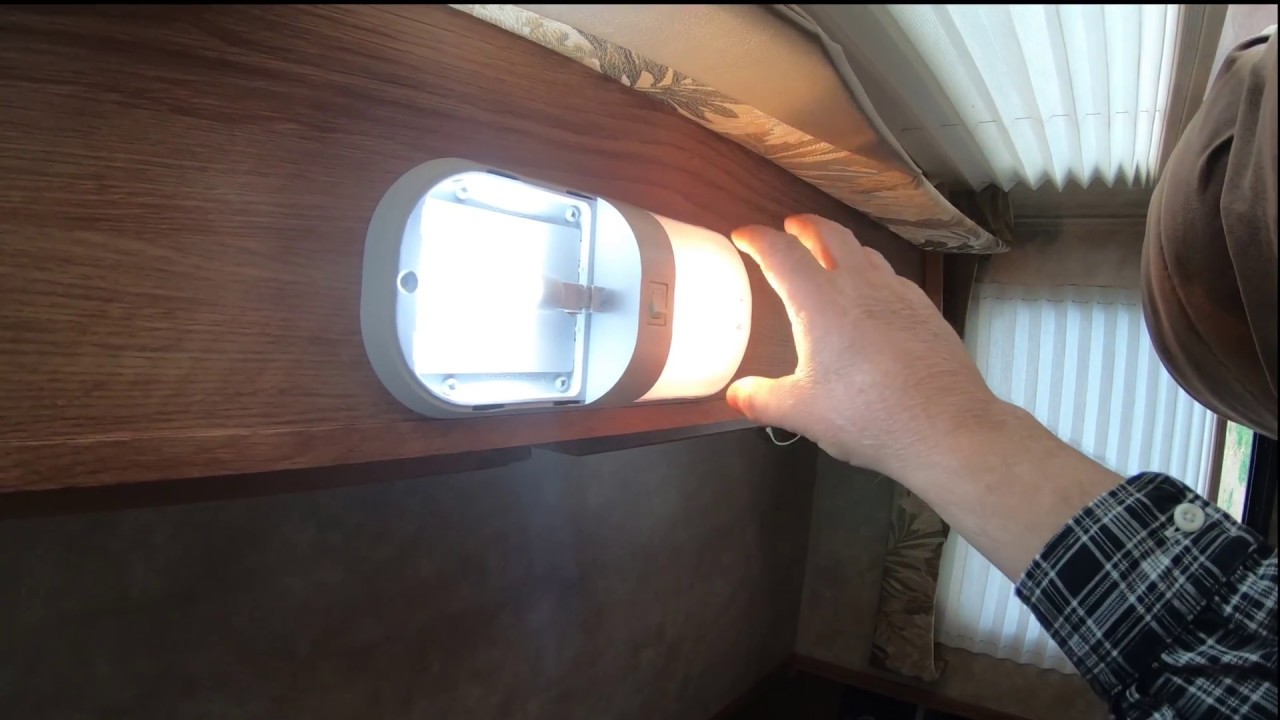
1. Inspect And Exam The Mechanism
As a RVers, you have multiple things to worry about and if possible, you want to get the new bulb in as soon as possible. Nonetheless, you should take a bit of time to thoroughly assess the mechanism of the lighting fixture before doing anything. Once you firmly grasp what you are dealing with, it’s a breeze to come up with a removal solution. Nowadays, there are 3 styles of mechanism that RV lighting fixtures. If you want to learn how to remove RV light covers then you must remember the characteristics of these mechanisms.
2. The Groove
Among the mechanisms that lightning fixtures on RV utilize, The Groove is the most forgiving to work with. To put it simply, covers in the category have a somewhat narrow edge that fits in a groove on the surface of the fixture bases. In order to aces the bulbs, place your fingers against the edge of the covers, apply pressure toward the center and lift the covers out.
3. The Latches
From the first glance, The Latches resemble The Groove but instead of a basic groove, there are 4 latches that hold the covers securely. If you need to get the covers out, you have to squeeze in from both sides and pull back simultaneously. In the case you manage to perform the action flawlessly, the light covers shall slide back which allow the latches to clear the fixture bases.
4. The Pry
So you have been running your hand all over the fixtures again and again but fail to locate grooves, latches and so on? In that scenario, there is a good chance that the fixtures employ The Pry mechanism. As the name suggests, you have to pry the covers out to reach the bulbs. Needless to say, you have to be extremely careful: you need to force the covers out but not to the point that could cause damages. In most of the case, tools with thin heads often work wonders when it comes to The Pry lighting fixtures.
5. Get The Light Covers Out
Once you manage to identify what mechanism your RV lighting fixtures use, the next step is to remove the covers. Considering the fact that most standard fixtures on RV have less than ideal endurances, take things slow at the beginning. Broke a particular part by mistake? No need to worry as you could readily acquire replacements at reasonable prices on the market these kinds of days. It’s still best that you don’t cause any damage though so as to save money for other needs. Normally, you should be able to master the removal techniques after a couple of practices.
6. Put The Light Covers Back
After you finished replacing the bulb of the fixtures, the only thing left to do is to put the covers back to where they belong. It’s a good idea to wash the covers to enhance the transfer of light. Wait until the covers get dry and move them into the base of the fixtures. For most of the time, the covers should go in without a hitch but in some cases, it might take a few moments for the component to regain their fitness.
Last Updated on March 19, 2019
